
Plant pots are an essential part of any indoor or outdoor garden. However, buying new pots can get expensive, and many store-bought options lack the unique charm of homemade décor. Why not recycle materials you already have to create your own plant pots? Not only will this help the environment by reducing waste, but it can also add a personalized touch to your home décor.
In this article, we’ll explore different methods to make your own plant pots using recycled materials. Whether you’re looking to repurpose plastic bottles, old cans, or even broken pottery, there’s a DIY solution for every situation. By the end of this article, you’ll have all the knowledge you need to turn waste into beautiful, eco-friendly plant pots for your home.
Why Use Recycled Materials for Plant Pots?
Recycling materials for plant pots is beneficial in many ways:
- Cost-effective: Using materials you already have saves money. Instead of buying new pots, you can create unique, one-of-a-kind pieces from things you might otherwise throw away.
- Eco-friendly: Reducing waste and reusing materials helps keep trash out of landfills and reduces the demand for new, manufactured products.
- Creative expression: Recycled plant pots allow you to customize your décor and make your home truly unique.
- Durability: Many recycled materials, when used properly, can be just as sturdy and functional as traditional pots.
Now that you know why recycled plant pots are great, let’s dive into how to make them.
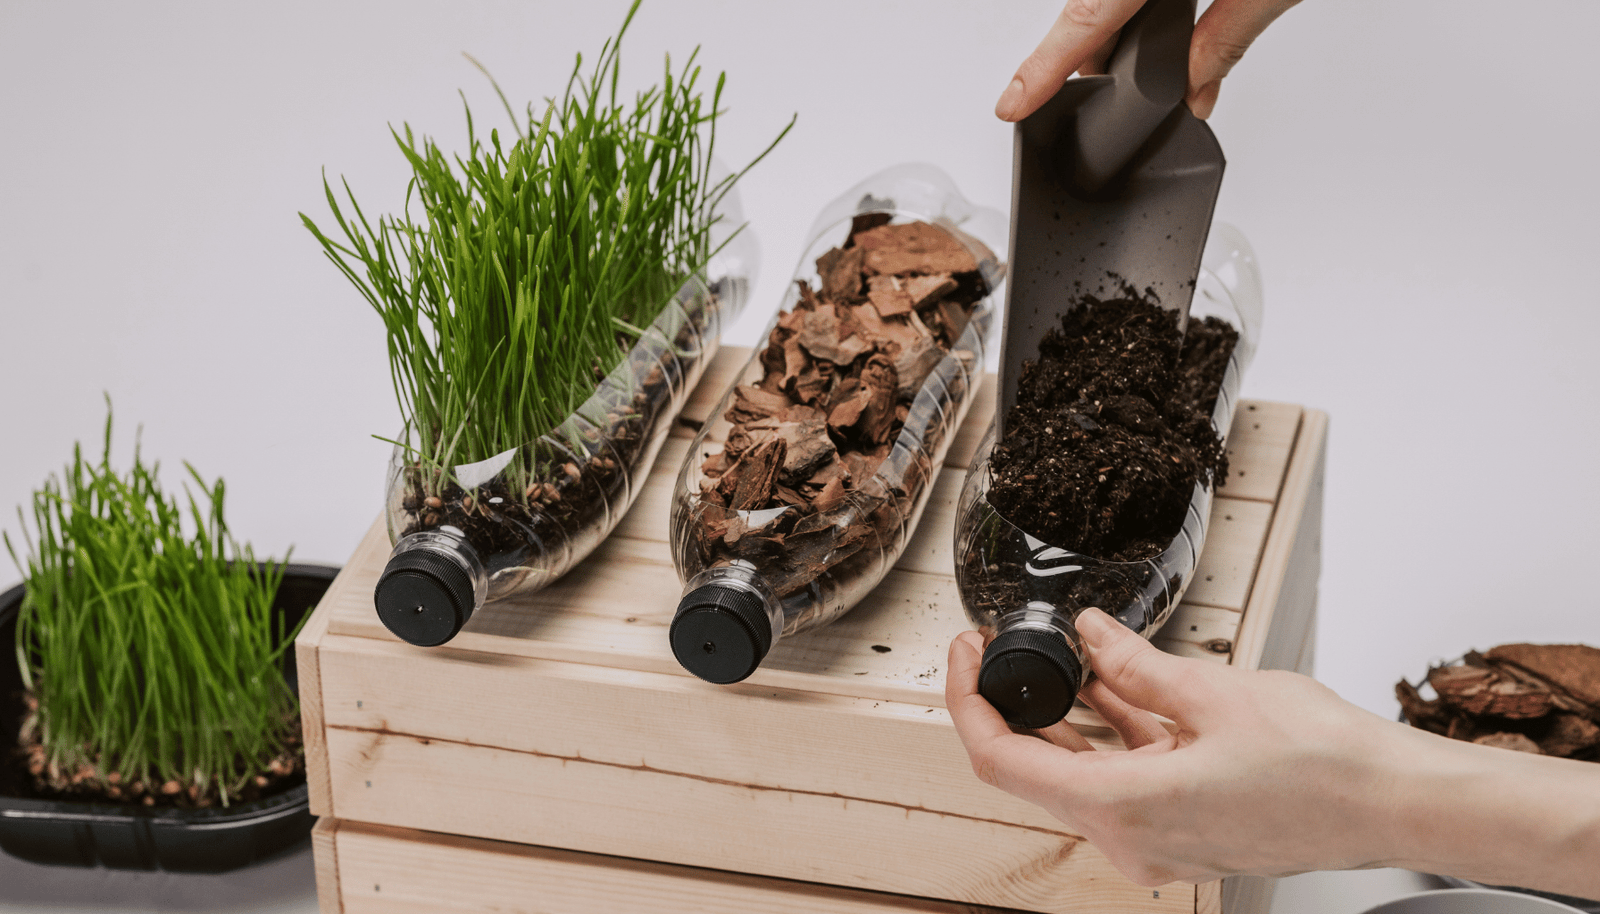
Plastic Bottle Planters
One of the most common materials for recycling into plant pots is plastic bottles. Almost everyone has a plastic bottle in their recycling bin, and turning them into plant pots is quick and simple.
Materials Needed:
- Plastic bottles (2-liter bottles work great)
- Scissors or a craft knife
- Paint (optional)
- Drainage material (like small rocks or gravel)
- Soil and plants of your choice
Steps:
- Cut the Bottle: Start by cutting your plastic bottle in half or just a third of the way down. You can create a shallow planter by cutting less of the bottle or a deeper planter by cutting more.
- Create Drainage Holes: Using a craft knife or scissors, make small holes in the bottom of the bottle. This allows excess water to drain and prevents root rot.
- Decorate (Optional): If you want your recycled plant pot to look more decorative, paint the bottle with your favorite colors or designs. You could even use fabric or paper to wrap the bottle for a more rustic look.
- Add Drainage Material: Before filling the pot with soil, place some small rocks or gravel at the bottom to ensure proper drainage.
- Fill with Soil and Plant: Add your soil and plant your chosen plant into the bottle. Make sure to water it gently and check for drainage regularly.
Plastic bottle plant pots are great for small plants or herbs, and you can make several to create a lovely display.
Tin Can Planters
Old tin cans are another fantastic material to repurpose into plant pots. They add a rustic, industrial feel to any space and are incredibly sturdy.
Materials Needed:
- Tin cans (empty and cleaned)
- Hammer and nail (or drill)
- Paint (optional)
- Drainage material (rocks or gravel)
- Soil and plants
Steps:
- Clean the Cans: First, ensure the tin cans are clean and free of any sharp edges. Remove the labels as well. You can soak the cans in soapy water to remove sticky residue.
- Create Drainage Holes: Use a hammer and nail or a drill to make holes in the bottom of the tin can. This is important to prevent water from pooling at the bottom.
- Paint and Decorate (Optional): For a fun and colorful look, you can paint your tin cans. Metallic finishes work well for an industrial look, or you can go bold with vibrant colors.
- Add Drainage Material: Place some gravel or small rocks at the bottom of the tin can to help with drainage.
- Plant and Enjoy: Fill the can with soil, add your plant, and give it a gentle watering. Tin can planters are perfect for small to medium-sized plants, and you can group several together for a beautiful display.
Wooden Crates or Old Wooden Boxes
If you have old wooden crates or boxes lying around, they can easily be transformed into beautiful plant pots. Wooden crates are perfect for larger plants and add a natural, rustic look to your home décor.
Materials Needed:
- Wooden crate or old wooden box
- Plastic liner or garbage bag (optional)
- Nails or staples
- Drill or screwdriver
- Gravel or small rocks for drainage
- Soil and plants
Steps:
- Line the Crate: If you don’t want the wood to get damaged by moisture, you can line the inside of the crate with a plastic liner or even a garbage bag. Poke a few holes in the liner to allow drainage.
- Create Drainage Holes: Use a drill to make holes in the bottom of the crate or box. This ensures that water won’t pool at the bottom and cause root rot.
- Add Drainage Material: Place a layer of small rocks or gravel at the bottom of the crate to promote drainage.
- Fill with Soil and Plant: Add your potting soil and plant your chosen plant. Wooden crates are excellent for larger plants like shrubs, ferns, or even small trees.
Wooden crates can be painted or stained for a more personalized look, or you can leave them in their natural state for a more rustic vibe.
Old Mugs and Teacups
Repurposing old mugs and teacups is a simple and fun way to create quirky plant pots. This method is great for smaller plants like succulents or herbs.
Materials Needed:
- Old mugs or teacups
- Drill or a nail
- Small rocks or gravel
- Soil and small plants (succulents, cacti, etc.)
Steps:
- Make Drainage Holes: Using a drill or nail, make a small hole at the bottom of the mug or teacup. This is crucial for drainage, as stagnant water can damage your plant’s roots.
- Add Drainage Material: Place a layer of small rocks or gravel at the bottom of the mug or teacup.
- Fill with Soil and Plant: Add potting soil and plant your succulent or herb. Water gently, as smaller containers dry out faster.
These upcycled mugs and teacups make unique, charming additions to any room and are perfect for giving a new life to chipped or mismatched cups.
Concrete Planters from Recycled Materials
Concrete planters are sleek, modern, and durable. If you’re looking to make something more industrial-looking, concrete might be your material of choice. The best part? You can create concrete planters using materials like old yogurt containers or cardboard boxes.
Materials Needed:
- Recycled containers (yogurt cups, plastic molds, or boxes)
- Concrete mix
- Water
- Oil (for mold release)
- Gloves and mixing tools
- Small rocks for drainage
- Plants
Steps:
- Prepare Your Molds: Find two containers that are the right size for your planter. One will be the outer mold, and the other will create the hole for the plant. Coat the inside of the outer mold with oil to ensure the concrete doesn’t stick.
- Mix the Concrete: Follow the instructions on your concrete mix package to prepare the concrete. You’ll want a consistency that is thick but pourable.
- Pour the Concrete: Pour the concrete into the outer mold, filling it halfway. Then, press the smaller mold into the center to create the hole for your plant. Add more concrete around the edges if needed.
- Let It Dry: Allow the concrete to dry for 24-48 hours, depending on the instructions.
- Remove the Mold: Once the concrete is dry, carefully remove both molds. You now have a solid, durable concrete planter ready for use.
- Add Drainage Material: Place small rocks at the bottom, add soil, and plant your chosen plant.
Concrete planters are heavy, so they work well for larger plants and provide excellent durability.
Conclusion: Sustainability Meets Style
Creating recycled plant pots for your home is a fantastic way to add a personal touch to your décor while helping the environment. Whether you use plastic bottles, tin cans, wooden crates, old mugs, or even concrete, each plant pot can be unique and customized to suit your style. Not only will you save money, but you’ll also create stunning, sustainable décor that helps reduce waste.
Start collecting your materials, gather your tools, and begin transforming your old items into beautiful plant pots. Soon, you’ll have an eco-friendly, one-of-a-kind garden, and you’ll feel proud knowing you contributed to a more sustainable planet.
Happy crafting and gardening!